Saturday, August 30, 2014

6 Days Of Fall - Give Thanks For All Things Gift Box

Hello My Crafty Friends,

Hope you're having an awesome day. 
Welcome to another "6 Days Of Fall"

For today's project I made a gift box called:
Give Thanks For All Things

May this project bring you inspiration for this fall.
Enjoy the pictures and the instructional video below.
Supplies Used

== Stamp Set ==
For All Things (c) #135155
For All Things (w) #13515

== Classic Stampin' Pads ==
 Baked Brown Sugar #131174

== Thick Baker's Twine ==
Baked Brown Sugar #135639

== Stampin' Write Markers ==
Baked Brown Sugar #131260
Mossy Meadow #133654

== Cardstock ==
Whisper White #100730

== Punches ==
Scalloped Tag Topper #133324

== Punch Board ==
Gift Box #135863

== Tools & Adhesives ==
Snail #104332
Bonefolder #102300
Stamping Sponges #101610

If you would like to purchase the supplies used for this project
 simply visit my online store.

I have provided the item #'s for the supplies.
Copy and paste the item numbers to the search box,
then add them to your shopping cart.

Remember to use the Current Hostess Code
For every purchase of $25 (before tax & shipping) you will receive a 
free DSP 4" x 6" sampler set of your choice.

Happy Crafting!

Thanks for stopping by and all of your support. Have a blessed day.

Lots of Hugs,

Lourdes Collazo, Sr. Associate
Stampin' Up! Independent Demonstrator
Demo ID: 2140659
EMail: CreativeCraftsNiche@GMail.com

Friday, August 29, 2014

6 Days Of Fall - Grateful For You Card

Hello My Crafty Friends,

Hope you're having an awesome day. 
I'm excited to share with you a series called "6 Days Of Fall"

For today's project I made a card called:
Grateful For You

May this project bring you inspiration for this fall.
Enjoy the pictures and the instructional video below.


Supplies Used

== Clear Mount Stamp Set ==
For All Things (c) #135155
For All Things (w) #135152

== Classic Stampin' Pads ==
 Baked Brown Sugar #131174
Smokey Slate #131179
Marina Mist #126962
Calypso Coral #126983
So Safron #126957

== Thick Baker's Twine ==
Baked Brown Sugar #135639

== Cardstock ==
Marina Mist # 119682
Baked Brown Sugar #131296
Whisper White #100730
Calypso Coral #122925

== Tools & Adhesives ==
Stampin' Dimensionals #104430
Snail Permanent Adhesive #104332
Simply Scored Stylus #125624
Bone Folder #102300
Simply Scored Board #122334
Stamping Sponges #101610

If you would like to purchase the supplies used for this project
 simply visit my online store.

I have provided the item #'s of the supplies.
Copy and paste the item numbers to the search box,
then add them to your shopping cart.

Remember to use the Current Hostess Code
For every purchase of $25 (before tax & shipping) you will receive a 
free DSP 4" x 6" sampler set of your choice.

Happy Crafting!

Thanks for stopping by and all of your support. Have a blessed day.

Lots of Hugs,

Lourdes Collazo, Sr. Associate
Stampin' Up! Independent Demonstrator
Demo ID: 2140659
EMail: CreativeCraftsNiche@GMail.com

Sunday, August 24, 2014

A Little Dash Of Christmas Mini Box & Envelope Pt. 2

Hello My Crafty Friends,

Hope you're having an awesome day. 
Welcome back to my blog. 
If you're here for the first time, Welcome.

For today's project I made 
A Mini Christmas Box & Envelope
to go with the Mini Christmas Cards I made yesterday.

I used some products from Stampin' Up!s 2014 Holiday Catalog.

May this project bring you inspiration for the Holidays.
Enjoy the pictures and the instructional video below.
To make the Christmas Mini Box use the Stampin' Trimmer to cut the paper down to size. 
There are two cardstock size options
For the first option: Cut a Whisper White cardstock at 7 1/2" x 5 1/2"
For the second option: Cut a Whisper White cardstock at 7 7/8" x 5 1/2"
With any option you choose you will score them the same 
(watch video below to see both options).

Then, using the Simply Scored Board, score the cardstock along the 
Long end at 1", 3 1/2", 4 1/2",  and the 7" mark. Rotate the cardstock and score along the 
Short end at 1", and the 3" mark.

Afterwards stamp a pattern on the cardstock using the snowflakes in the Endless Wishes stamp set
Then, burnish the scores, glue all the top flaps inward.

Using the 3/4" circle punch, locate the front of your box, and punch a centered half circle at the top portion of the box; this will create an indentation making it easy to pull out the mini cards

Adhere the box using Tombo Mono Multi Liquid Glue. First the side ends of the box, then the bottom ends of the box. Be sure to glue the front bottom flap last. Then use a bone folder to burnish the bottom of the box through the inside of the box.

Using the left over scrap cardstock and the Modern Label Punch, punch out a label.
Then, from the Endless Wishes stamp set, stamp the "christmas" sentiment on the bottom portion of the label, and "a little dash of" sentiment on the top portion of the label.

To embellish the label add some Rhinestone Basic Jewels to the label or the box.
Adhere the label to the box using Stampin' Dimensionals.
To make the Mini Christmas Envelope, use the Stampin' Trimmer to
cut a piece of White Multi Purpose Paper at 4 1/2" x 4 1/2"

Using the Envelope Punch Board place the paper at the 2" mark.
Punch, score, then rotate the paper and align the score line with the notch of the punch.
Repeat punching, scoring, and rotating till you have done this on all sides of the paper.
Use the opposite side of the punch to round off the corners (optional)

Burnish the sides the scores using a Bone Folder.

Then, adhere the left, right and bottom sides of the envelope using the Fast Fuse Adhesive.

Using the smallest snowflake in the Endless Wishes stamp set, stamp a cluster of snowflakes on the bottom left-hand side of the front of the envelope.

Note: You can also make envelopes using the Gift Box Punch Board
(see video below for tutorial)

Once your box and envelopes are finished slip in the mini cards and envelopes into the box.
Now you are ready for the holidays.
Supplies You will need to make this
and yesterday's part one project

== Clear Mount Stamp Set ==
Endless Wishes (p) #136829

== Classic Stampin' Pads ==
Smokey Slate #131179
Lost Lagoon #133644
Soft Sky #131181
Pear Pizzazz #131180

== Cardstock ==
Whisper White #100730
White Multi Purpose Paper

== Punches ==
3/4" Circle Punch #119873
Modern Label #119849

== Punch Boards ==
Envelope Punch Board #133774
or
Gift Box Punch Board #135863

== Embelishments ==
All is Calm Designer Washi Tape #135844
Rhinestone Basic Jewels #119246

== Tools  & Adhesives ==
Simply Scored Stylus #125624
Bone Folder #102300
Simply Scored Board #122334
Tombo Mono Liquid Multi Purpose Glue #110755
Stampin' Trimmer #126889
Stampin' Dimensionals #104430
Fast Fuse #129026

This video is Part Two of this Project

Click here to see blog post and video of Part One.

If you would like to purchase the supplies used for this project
 simply visit my online store.

I have provided the item #'s for the supplies.
Copy and paste the item numbers to the search box,
then add them to your shopping cart.

Remember to use the Current Hostess Code
VUQVJDP2
This code Expires August 31, 2014 
but you can click on the link above for the Current Hostess Code

For every purchase of $25 (before tax & shipping) you will receive a 
free DSP 4" x 6" sampler set of your choice.

Here are a couple of links to remind you 
of Stampin' Up!s other offers, and my freebies:


Happy Crafting!

Thanks for stopping by and all of your support. Have a blessed day.

Lots of Hugs,

Lourdes Collazo, Sr. Associate
Stampin' Up! Independent Demonstrator
Demo ID: 2140659
EMail: CreativeCraftsNiche@GMail.com

Saturday, August 23, 2014

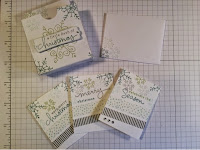
Endless Wishes Mini Christmas Cards Pt. 1

Hello My Crafty Friends,


Hope you're having an awesome day. 
Welcome back to my blog. 
If you're here for the first time, Welcome.

For today's project I made 
Mini Christmas Cards

I used some products from Stampin' Up!s 2014 Holiday Catalog.

May this project bring you inspiration for the Holidays.
Enjoy the pictures and the instructional video below.

Using Stampin' Trimmer and one sheet of Wisper White cardstock
cut width-wise at the 2 1/8" mark three times.

Then cut each of the four pieces that you will be left with 
at the 5 1/2" mark on your Stampin' Trimmer.
You will be left with eight pieces of cardstock that measure 2 1/8" x 2 3/4".

Afterwards, use the Simply Scored Board to score
each of the eight pieces width-wise at the 2 3/4" mark.

Then use the All is Calm Designer Washi Tape, 
and Endless Wishes stamp set to embellish your cards.

Watch video below for tutorial.


Supplies You will need to make this
and tomorrow's part two project

== Clear Mount Stamp Set ==
Endless Wishes (p) #136829

== Classic Stampin' Pads ==
Smokey Slate #131179
Lost Lagoon #133644
Soft Sky #131181
Pear Pizzazz #131180

== Cardstock ==
Whisper White #100730
White Multi Purpose Paper

== Punches ==
3/4" Circle Punch #119873
Modern Label #119849

== Punch Boards ==
Envelope Punch Board #133774
or
Gift Box Punch Board #135863

== Embelishments ==
All is Calm Designer Washi Tape #135844
Rhinestone Basic Jewels #119246

== Tools  & Adhesives ==
Simply Scored Stylus #125624
Bone Folder #102300
Simply Scored Board #122334
Tombo Mono Liquid Multi Purpose Glue #110755
Stampin' Trimmer #126889
Stampin' Dimensionals #104430
Fast Fuse #129026

This is Part One of this project


Click here for the blog post and video for Part Two.

If you would like to purchase the supplies used for this project
 simply visit my online store.

I have provided the item #'s for the supplies.
Copy and paste the item numbers to the search box,
then add them to your shopping cart.

Remember to use the Current Hostess Code
VUQVJDP2
This code Expires August 31, 2014 
but you can click on the link above for the Current Hostess Code

For every purchase of $25 (before tax & shipping) you will receive a 
free DSP 4" x 6" sampler set of your choice.

Here are a couple of links to remind you 
of Stampin' Up!s other offers, and my freebies:


Happy Crafting!

Thanks for stopping by and all of your support. Have a blessed day.

Lots of Hugs,

Lourdes Collazo, Sr. Associate
Stampin' Up! Independent Demonstrator
Demo ID: 2140659
EMail: CreativeCraftsNiche@GMail.com

Thursday, August 7, 2014

Stampin' Up! NY Zoo Babies Baby Shower Project Share & Setup

Hello My Crafty Friends,
I'm back with a Huge Stampin' Up! Project. 
I hope you are enjoying your day and doing well along side your loved ones.
This project was for my youngest sister's baby shower.
This project took me days to complete, so I chose not to record the process of creativity but I took pictures and recorded afterwards.
Here are the pictures, videos, links, and list of items used.


In This Video I Share The Projects & The Stamp Sets Used

This Video Is The Setup At The Baby Shower


------------- Project Supplies ------------
= Stamp Set & Framelits Bundle =

= Photopolymer Stamp Sets =

= Clear Mount Stamps =

= Big Shot & Framelits =

= Stampin' Pads =

= Core'dinations Cardstock =

= Designer Series Paper =

= Cardstock =

= Tools =

= Adhesives =

= In Color Stampin' Write Markers =

= Packaging =

= Stitched Satin Ribbon =

= Thick Baker's Twine =
------------------------------------

Online Store

Current Hostess Code

Join Paper Pumpkin
50% off your first Two months (New Subscribers Only)
* When Placing Your Order Use The Promo Code HALFOFF2
Subscribe by September 10, 2014
*Offer valid for month-to-month subscriptions only

Enjoy the benefits & discounts 
for choosing me as your Stampin' Up! Demonstrator.

Thanks for stopping by and for all your support.

Lots of Hugs & Have a Blessed Day!

~Lourdes